
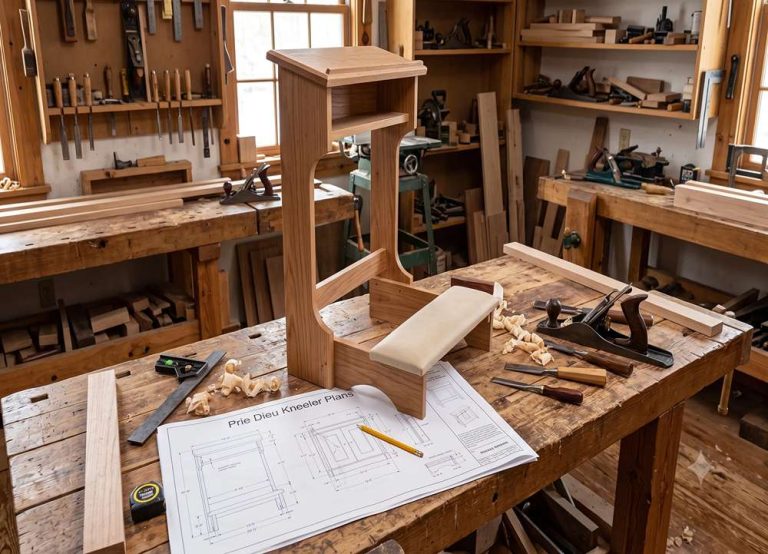
This prayer kneeler woodworking plan provides a practical starting point for building a compact home prie-dieu with a padded kneeling platform and an angled book rest. The finished piece is approximately 24 in. wide, 22 in. deep, and 32 in. high (610 × 559 × 813 mm). Because comfort depends on the user’s height, mobility, and preferred posture, make a quick cardboard or scrap-wood mock-up before cutting the final material.
This is an intermediate furniture project. It requires accurate measuring, square assembly, and a secure connection between the front frame, side rails, and kneeling platform. If you would like to compare it with easier or more advanced builds, visit our complete woodworking projects guide.
- Skill level: intermediate
- Typical build time: one weekend, excluding finish curing time
- Finished size: 24 in. W × 22 in. D × 32 in. H (610 × 559 × 813 mm)
- Kneeling pad: approximately 20 in. W × 10 in. D × 2 in. thick (508 × 254 × 51 mm)
- Recommended wood: oak, maple, poplar, or straight-grained pine
- Suggested joinery: mortise-and-tenon or dowels for the strongest result; pocket screws are a simpler alternative
Prayer kneeler dimensions and fit
The dimensions below suit many adults, but they are not universal. The most important measurements are the height of the padded kneeling surface and the position of the book rest. In this plan, the top of the finished cushion is about 8 1/2 in. (216 mm) above the floor, while the lower edge of the book rest is about 30 in. (762 mm) high.
Before building, kneel on a firm cushion placed on a stable platform and hold a book at a comfortable reading height. Check that your back, shoulders, and neck remain relaxed. Increase or decrease the rear-leg and platform height if needed. Adjust the front-post or book-rest height before cutting if the intended user is particularly tall or short.
Important: this project is intended as a kneeler, not as a chair, step, or mobility aid. Anyone with knee, hip, back, balance, or circulation problems should confirm that kneeling is appropriate and should use assistance when necessary.
Materials and hardware
- Two straight 2×2 boards for the front posts and rear legs (actual size about 1 1/2 × 1 1/2 in.)
- Approximately 12 linear feet of 1×4 lumber (actual size about 3/4 × 3 1/2 in.)
- One piece of 3/4-in. furniture-grade plywood or a glued solid-wood panel for the book rest
- One piece of 3/4-in. plywood for the kneeling platform
- One 1×2 board for the book ledge and platform cleats
- Wood glue
- 1 1/4-in. and 2-in. wood screws appropriate for the chosen joinery
- Four non-slip furniture pads for the feet
- High-density upholstery foam, approximately 2 in. thick
- Durable upholstery fabric or vinyl and staples
- Wood filler, sandpaper, and the finish of your choice
Hardwoods such as oak and maple provide excellent durability. Poplar is easy to paint, while clear pine is affordable and easy to work. Avoid twisted stock, large loose knots, and construction lumber that is still wet. For more help selecting material, see our guide to wood and materials for woodworking.
Cut list
| Part | Qty. | Nominal stock | Cut size | Purpose |
|---|---|---|---|---|
| Front posts | 2 | 2×2 | 30 in. (762 mm) | Support the book rest and front frame |
| Rear legs | 2 | 2×2 | 7 in. (178 mm) | Support the rear of the kneeling assembly |
| Front stretchers | 2 | 1×4 | 21 in. (533 mm) | Connect the front posts |
| Side rails | 2 | 1×4 | 20 in. (508 mm) | Connect the front posts to the rear legs |
| Rear cross rail | 1 | 1×4 | 21 in. (533 mm) | Keeps the rear assembly square |
| Kneeling platform | 1 | 3/4-in. panel | 21 × 11 in. (533 × 279 mm) | Supports the removable cushion |
| Platform cleats | 2 | 1×2 | 11 in. (279 mm) | Support the platform inside the side rails |
| Book rest | 1 | 3/4-in. panel | 24 × 12 in. (610 × 305 mm) | Angled reading surface |
| Book ledge | 1 | 1×2 | 24 in. (610 mm) | Stops a book from sliding |
| Angle blocks | 2 | 1×3 or scrap | Cut to fit at 10° | Support the sloped book rest |
The 21-in. crosspieces assume front posts with an actual thickness of 1 1/2 in., giving a finished outside width of 24 in. Measure your stock before cutting because actual lumber dimensions can vary.
Tools needed
- Tape measure, pencil, combination square, and bevel gauge
- Miter saw, circular saw with a guide, or table saw
- Drill/driver and countersink bit
- Doweling jig, pocket-hole jig, or mortising tools according to your preferred joinery
- At least four clamps
- Random-orbit sander or sanding block
- Jigsaw or router if you want shaped edges
- Staple gun for the cushion
- Eye and hearing protection; dust extraction or a suitable respirator when required
If you are assembling a basic workshop, our woodworking tools and equipment guide explains the main tool categories and their uses.
How to build the prayer kneeler
1. Make a full-size comfort mock-up
Stack stable boards or boxes to simulate the kneeling height and book-rest height. Add the intended cushion and test the position carefully. The book rest should be high enough that you do not have to round your shoulders or bend your neck sharply. Mark any changes and update the cut list before working on the final lumber.
2. Mill and label the parts
Cut the two front posts together so they finish at exactly the same length. Do the same with the rear legs and side rails. Check each crosscut with a square, label every piece, and mark the inside and outside faces. Sand the faces to 120 grit before assembly, but leave final sanding until later.
3. Assemble the front frame
Place the two 30-in. front posts on a flat surface with 21 in. between their inside faces. Install one stretcher near the bottom and the second near the top. Mortise-and-tenon or dowel joints give the cleanest, strongest result. Pocket screws installed from the hidden side offer an accessible alternative. Apply glue, clamp the frame, measure both diagonals, and adjust until they are equal.
4. Add the side rails and rear legs
Attach one 20-in. side rail to the inside face of each front post. Keep the lower edges at the same height and ensure the rails are parallel. Join a 7-in. rear leg beneath the back end of each rail. Install the 21-in. rear cross rail between the rear legs. Dry-assemble first and confirm that all four feet contact the floor before applying glue.
5. Fit the kneeling platform
Fasten a 1×2 cleat to the inside of each side rail so that the platform will sit level. Position the 21 × 11-in. platform toward the rear of the frame and leave sufficient open space between it and the front posts for the user’s lower legs. Screw the platform to the cleats from below so it can be replaced later. Do not rely on nails alone.
6. Install the angled book rest
Cut two matching support blocks at approximately 10 degrees and attach them securely to the top of the front frame. Place the 24 × 12-in. book-rest panel on the supports so that it slopes downward toward the user. Test the position before fastening it from underneath. Glue the 1×2 ledge along the lower edge, then add screws from the underside where they will not be visible.
A 10-degree slope is a starting point, not a rule. A steeper angle may hold a book more securely, while a shallower angle can be more comfortable for writing or resting the hands.
7. Check stability before finishing
Set the kneeler on a level floor and press firmly in several directions. It should not rack, twist, or rock. Confirm that all joints are tight, all screw heads are below the surface, and the book rest has no sharp corners. Correct structural problems before applying finish.
8. Sand and apply the finish
Ease exposed edges with sandpaper or a small round-over bit. Sand progressively to 180 grit, remove the dust, and apply a durable furniture finish. Water-based polyurethane preserves a light wood color and dries quickly; oil-based finishes generally add warmth but require more ventilation and curing time. Follow the product manufacturer’s application and safety instructions.
For a painted kneeler, use primer followed by two thin coats of furniture paint. Allow the final finish to cure fully before attaching upholstery or using the piece. Our guide to woodworking finishing and surface treatment covers preparation and common finish types.
9. Make the removable cushion
Cut high-density foam to approximately 20 × 10 in. Place it on a thin 1/4-in. plywood backing, wrap it with upholstery batting if desired, and cover it with durable fabric. Pull the fabric evenly and staple it to the underside of the backing. Attach the cushion to the platform with hook-and-loop strips so it can be removed for cleaning or replacement.
Joinery options
| Method | Advantages | Considerations |
|---|---|---|
| Mortise-and-tenon | Traditional appearance and excellent resistance to racking | Requires careful layout and accurate cutting |
| Dowels | Strong, hidden, and achievable with a good jig | Matching holes must align precisely |
| Pocket screws | Fast and approachable for an intermediate beginner | Use glue, place holes on hidden faces, and do not overtighten |
Optional design changes
- Foldable kneeler: replace fixed side-rail joints with rated folding hardware only after verifying that the locked structure cannot collapse during use.
- Storage shelf: add a shallow shelf between the front stretchers, leaving adequate foot and leg clearance.
- Decorative side profiles: soften the ends of the side rails with a jigsaw or template-guided router before assembly.
- Adjustable book rest: use secure indexing brackets instead of simple hinges so the support cannot slip under pressure.
- Personal details: add a carved symbol, an inscription, or contrasting wood only where it will not weaken a joint.
Common mistakes to avoid
- Building directly from standard dimensions without testing the user’s posture
- Using warped or wet lumber
- Failing to compare diagonal measurements during glue-up
- Making the book ledge so tall that it presses uncomfortably against the hands
- Using soft cushion foam that compresses completely under body weight
- Leaving sharp corners on the book rest, rails, or platform
- Treating the kneeler as a seat, step, or medical support
Frequently asked questions
What is a prayer kneeler called?
A freestanding prayer kneeler is often called a prie-dieu, a French term traditionally used for a piece of furniture with a low kneeling surface and a raised support for a book or the hands.
How high should a prayer kneeler be?
There is no single correct height. For this project, the top of the cushion is approximately 8 1/2 in. above the floor and the lower edge of the book rest is about 30 in. high. Test both heights with a mock-up and modify them for the intended user.
What is the best wood for a prayer kneeler?
Oak and maple are durable choices for a long-lasting furniture piece. Poplar is suitable for painting, while clear pine can reduce cost and is easier to machine. Straight, dry stock and sound joinery matter more than selecting an expensive species.
How thick should the kneeling pad be?
A 2-in. high-density foam pad is a useful starting point. Foam firmness is as important as thickness: a pad that compresses fully will provide little protection. A removable cushion makes later adjustment or replacement easier.
Can this plan be built with pocket screws?
Yes. Position pocket holes on hidden faces, use the correct screw type and length for the wood, add glue to sound mating surfaces, and clamp the assembly square. Dowels or mortise-and-tenon joints provide a more traditional appearance.

Hi everyone! I’m a woodworker and blogger, and this is my woodworking blog. In my blog, I share tips and tricks for woodworkers of all skill levels, as well as project ideas that you can try yourself.